If head lice removal is a necessity in your household and you prefer using natural approaches for your family’s health and wellbeing, then this solution is for you!
Lice are becoming more resistant to over-the-counter remedies. So that means each new product made to treat hair lice is stronger than the last one. That’s a scary thought when it comes to putting it on your child’s scalp where it may absorb and cause side effects.
Good news: Vinegar, when used correctly, can be just as effective at treating head lice — if not more effective! In the world of natural home remedies, vinegar & lice go hand in hand.
Don’t worry, getting rid of lice isn’t as bad as you think.
Following is everything you need to know about using vinegar as a natural head lice treatment at home, plus when it’s time to see a doctor.
If you have kids, one thing that can scare you instantly is a report of hair lice in the school.
You immediately start itching as you eyeball your child’s head and try to determine if they have lice from across the room.
Sorry to tell you — you’re gonna have to get up close and personal with the lice. I’ll explain why.
Signs Of Head Lice
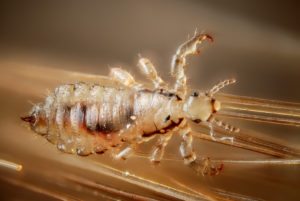
Although they’re very small, lice can be seen by the naked eye (but not from across the room) — as seen here:
Here’s what to look for if you suspect hair lice:
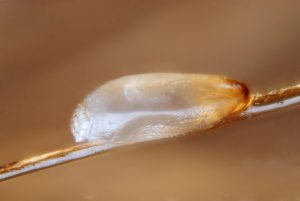
- Nits (lice eggs) – These look like tiny yellow, tan, or brown dots before they hatch.
- Nymphs (baby lice) – Nymphs start small and become adult lice about 1 to 2 weeks after they hatch.
- Adult lice – The adult louse is no bigger than a sesame seed. It is grayish-white or tan in color.
- Scratching – With lice bites come itching and scratching. Itching may not always start right away — that depends on how sensitive a child’s skin is to the lice.
- Small red bumps or sores from scratching – For some kids, the irritation is mild. For others, a more bothersome rash may develop.
Tips For Finding Hair Lice
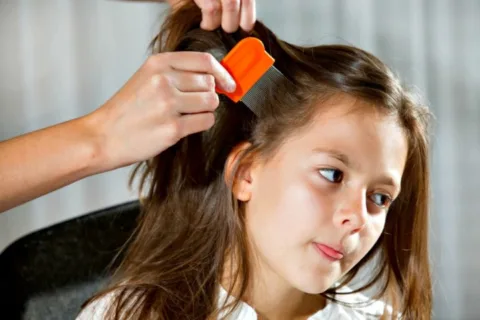
Check first behind the ears and the nape of the neck. These are favored places for lice to congregate.
Here are some tips to use when checking for head lice:
- Lighting – Stand your child under a good light source. Sunlight is great — but the warmer your child’s head gets, the more active those little boogers become.
- Hair color – Having blonde hair makes it harder to spot the nits (or eggs) on the hair strand — so look closely.
- Live vs. dead lice – Live nits are generally white in color. They turn brown after they’ve died.
- Size of lice – Lice look like tiny spots on the hair strand — about the size of a single grain of sand.
- Number of lice – All you need to see is a single bug to know that you need to handle the situation right away.
Next, check the crown of the head and spot check other areas around the head.
Did you find evidence of lice? Don’t panic.
Supplies Needed For This Vinegar Lice Home Remedy
Sure, you could buy over-the-counter lice remedies, but they’re not nearly as safe and gentle as using vinegar to remove hair lice and nits. This vinegar lice remedy is much better.
Here’s all you need for head lice removal at home:
- distilled white vinegar
- a metal tooth nit comb
- a cup
- a shallow bowl
- a sewing needle (or straight pin)
- a white sheet (or towel)
Truthfully, you’ll probably want to grab some age-appropriate distractions as well — since this isn’t a quick process!
Steps For Preparing The Head
It’s important to choose an area where you have enough room for your supplies. Bathrooms, kitchens, and even the great outdoors are good places for at home treatment of lice.
Follow these steps for getting the hair wet:
 Set up the area you will be working in to comb out the lice.
- Fill a cup with the distilled white vinegar.
- Pour additional vinegar in a shallow bowl.
- Get your white sheet (or towel), your nit comb and your sewing needle (or straight pin) on a table beside you.
- Wash your child’s hair — but do not use conditioner. Just rinse with water.
- Saturate the hair with the vinegar. Scrub it into the scalp and through the hair as a final rinse.
- Leave hair dripping wet.
- Get comfortable in the spot you’ve set up for combing the lice. (The simplest way is to sit the child on the floor between your knees, as you sit above them.)
- Take your white towel (or sheet) and make a drape under your child’s hair — so it comes out and covers your legs.
Now you’re ready to begin combing!
Steps For Combing The Head
Grab your comb and get ready to stay where you are for a little while.
Here are the 3 steps for using a comb with hair lice removal:
- Dip: Dip the nit comb in the cup of vinegar.
- Comb: Starting at the nape of the neck, start combing from the scalp to the ends of the hair.
- Scrape: As you see lice or nits accumulate on the nit comb, take the needle or straight pin and scrape them off into the shallow bowl of vinegar.
Continue combing this way over the entire head.
Some tips:
- Make sure that you’re combing small sections from scalp to the end of the hair strands.
- Keep dipping your cleaned nit comb into the cup of vinegar.
- Put all nits and lice that you find into the bowl.
- Keep combing until you no longer find anything coming out onto the comb.
Once the nit comb comes out clean from all areas of your child’s head, stop dipping the comb into the clean vinegar — but continue combing until their hair is dry.
TIP: This vinegar lice home remedy dissolves the glue holding the nit to the hair strand, but will not kill the nit. That’s why it’s extremely important to comb until the hair is completely dry — so you’ll catch even the tiniest nits that remain.
How To Remove Lice From Other Places
Once the hair is completely dry and there are no more lice found, put the towel (or sheet) drape into the washing machine — along with the child’s bed linens and clothes.
Wash everything using hot water, and be sure to dry thoroughly in the clothes dryer. Lice and nits will die from the heat!
Put your child’s pillows (without the pillowcases) into the dryer and run for a full drying cycle.
Vacuum the affected mattress and carpeted areas as well.
NOTE: Repeat this entire process in 7 days to remove any newly hatched lice that may have survived the first treatment. Skipping this step could invite a re-infestation of hair lice in your family!
When To Call The Doctor
If you tried this vinegar lice home remedy and it didn’t worked, then it’s time to see a doctor.
Also, don’t use over-the-counter remedies to treat your child for hair lice unless you’re 100% certain that your child has them and the vinegar head lice removal treatment didn’t work.
Since lice are insects, most products to get rid of them have pesticides in them. You shouldn’t expose your child to such harsh chemicals unless it’s absolutely necessary — because they can cause skin and eye irritation.
That’s why we suggest this natural home remedy for lice. But if you’re not sure that you got them all, or you’re worried about a re-infestation, then a trip to the doctor is a reasonable next step.
You should call your doctor if:
- You’re not sure whether your child has lice.
- Your child is under 2 years old.
- Treatment doesn’t get rid of the lice.
- Your child has infected sores that get worse or do not heal.
- Your child is itchy or scratching in areas other than the scalp.
- You have questions about your child’s illness or treatment.
https://youtu.be/inQqRt5meb4
More Natural Lice Treatment Ideas
In addition to the links I’ve included above, I found these tips for head lice removal very helpful as well:
- Home Treatment For Lice – Beyond Vinegar
- How Permethrin Is Used For Ticks & Lice
- How To Treat Your House After A Lice Outbreak
- More Vinegar Combinations To Treat Lice
I’m a health nut, a frugal mom, a dog lover, a DIYer, and a gadget girl. Personally, as a post-divorce, working single mom on a budget I have a lot of experiences that I enjoy sharing so others can learn from the things I wish I knew earlier! Professionally, I’ve worked full-time in a variety of marketing, sales, and editing jobs. You can always find me at the corner of Good News & Fun Times as Managing Editor at The Fun Times Guide (32 fun & helpful websites).

